

A Hell So Terrible – Short Sample Gameplay
Disclaimer: Please note that all graphics shown here are from my barely competent homemade playtest kit for Tabletop Simulator. It is not meant to please anyone’s eyes but my own. And I have rather low standards.
A Hell So Terrible is quite a different design style for me. Yes, of course it has the usual historically-weighted chaos and you see those same tracks that I often use to control “bot” movement and action. But the activation and combat system is a new twist for me, and the tracks actually guide the player’s units more so than the AI. I also believe that this particular mix of new mechanics does a terrific job of replicating the situation at Verdun in all its gory details while still remaining quite accessible, playable, and yes… even fun! So, let’s take a brief journey through part of the first game turn of the main German front – the Center Sector – the only Sector the player can activate on turn 1.

Initial Event Phase
Our player, Don, draws the top Event Card from the deck. This card is the Major French Counterattack card. Luckily for Don, all German units are still in their starting trenches, and the French will not attack nor be placed into those trenches at any time. Therefore, this beginning event has no effect on the game and Don breathes a sigh of relief.

Command Point Phase
Don next determines the number of Command Points (CP) earned this turn. This being the first turn, he gets a whopping 15 CP and adjusts the CP Track accordingly. Every turn grants a different number of CP, and the first turn is by far the most generous. Remaining CP do carry forward to the following turns, so Don will be careful to save some for later.

Air Superiority Phase
The Germans begin the game with the Dogfight Advantage (per the Game Turn Track) and during the Dogfight Step they therefore roll two black dice (using only the higher die result) versus one French blue die. Don rolls a “6” and “3” for the Germans and a “3” for the French. The Germans win the dogfight (higher roll wins) and therefore the Germans maintain Air Superiority for the turn.

Heavy Artillery Bombardment Phase
This being the first turn, Don conducts the Trommelfeuer Special Step instead of the normal Bombardment Steps. He places 20 Bombardment and 5 Big Bertha markers facedown onto eligible spaces on the map, including the Voie Sacrée area, but no more than two markers per space (one of each) is allowed (except for the Voie Sacrée area). After placing all the markers, he conducts the Voie Sacrée Interdiction Step.
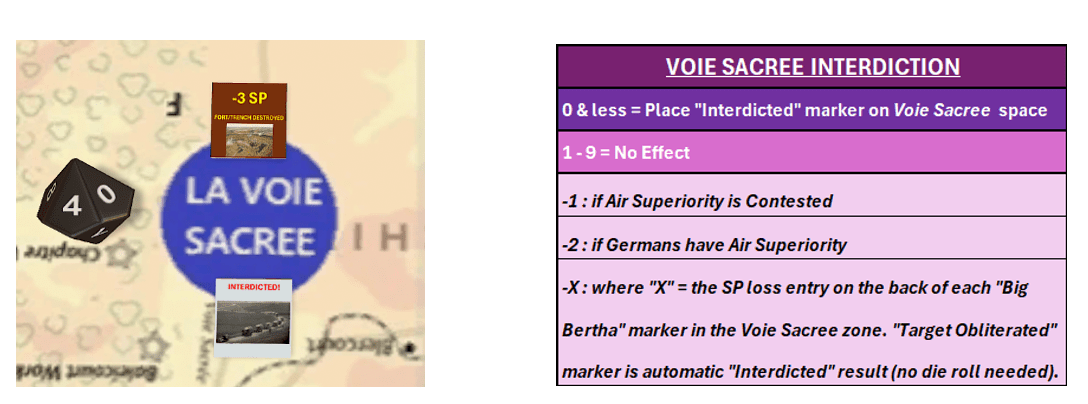
Don had placed one Big Bertha marker on the Voie Sacrée area and he now flips it over, applying its effect to the Interdiction die roll. The effect is a “-3” modifier from the die roll due to the Big Bertha marker’s “-3 SP” effect. He also has German Air Superiority, which is worth another “-2”, and therefore the total die roll modifier is “-5”. Don rolls a “4” on the die, which is a net “-1” and looking at the Voie Sacrée Interdiction Table, this means the Voie Sacrée is interdicted. Don places an “Interdicted” marker on the area and this can have significant game effects later in the turn.
Activation Phase
Don first resolves the Choose Sector Step and since this is Game Turn 1, only the Center Sector can be activated.

Before activating any units, the Event Card Step is conducted, and Don has to draw another Event Card. He draws the French Patrols & Garrisons card. Looking at the card and referencing the “February Game Turns” entry, he has to roll a D10 and place a 2nd Line Unknown French Unit in front of the German unit on the rolled Track #. He rolls a “3” and places a random, facedown 2nd Line French unit in the space in front of the German unit on Track #3. Note that this unit is placed on top of the Bombardment and Big Bertha markers in that space because it is not affected by those markers – technically the unit arrived there after the bombardment impacted.

Don now does the Gather Activation Dice Step, in which he decides what kinds of Activation Dice he is going to roll for his units. Note that the Activation Dice will not be regular D6’s in the final version of the game – they will be custom graphic dice. He has four German units in this Sector – Track #’s 3, 4, 5, and 6.

So, he will be gathering four Movement type Dice and four Casualty type Dice. The default dice to use are four green Advance Dice and four orange Friction dice. Because it’s the first turn and he needs a good start, Don spends 4 Command Points to convert all four Advance Dice to black Infiltration dice. He now has 11 CP remaining. And because all four German units start stacked with their Support markers, all four Friction dice are converted to the better red Suppression Dice (which is a free conversion if the Support marker is stacked with, or adjacent to, its German corresponding unit). Don will be rolling four black dice for Movement and four red dice for Casualties. His black dice rolls are 2, 4, 4, 5 and his red dice rolls are 1, 2, 5, 5.
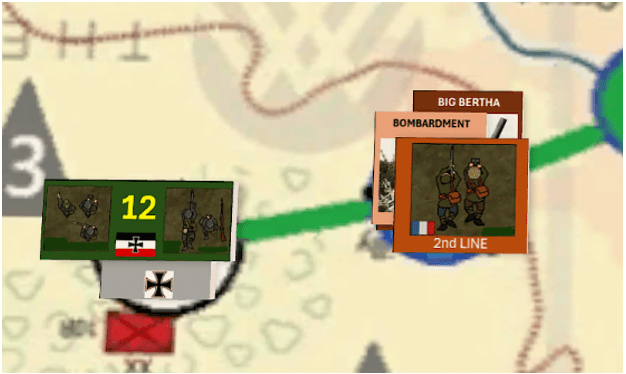
Don starts the Activation Step by assigning his dice in pairs – one black and one red – to each of the four German units in the Center Sector. He assigns the dice as follows, black die first and red die second: Track #3 = 5/5, #4 = 2/1, #5 = 4/5, and #6 = 4/2.

Track #3: Don opts to activate the German unit on Track #3 first. The fact that he assigned a “doubles” combo (5/5) to this unit triggers German Command Efficiency. In this case, however, he can’t use any of its advantages – reduce an SP loss by one, move an extra space, or move up its Support marker – since none of those bonuses can be applied in the current circumstances. The black 5 allows the German unit to move up to two spaces, but because there is an enemy unit in the adjacent space, it can only move one. Don moves the unit into the space with the French unit in space #1. First, he reveals the two Unknown French units (a 7 SP unit and a 3 SP unit) and then the Bombardment and Big Bertha markers. He applies their effects on the French 1st Line unit only (not the 2nd Line unit). The markers are “No Effect” and “-3 SP”, so the French 1st Line unit’s 7 SP value is reduced to 4 SP.

Don then replaces the two Unknown French unit markers with Revealed French unit counters, each showing the SP strength of each unit (note that there is no need any more to distinguish between 1st Line and 2nd Line units). Don now resolves combat, which is simple and straightforward.

He rolls a black D10 for the Germans and adds it to the German unit’s SP value (12 in this combat) to get their Combat Score. At the same time, he would normally do the same for the French, using a blue D10, and adding both French units’ SP together into one total. But because the French are in a Trench space, he rolls two blue D10 and uses only the higher of the two rolls. The black die is a 7, so the German score is 19. The French rolls are 6 and 3, so they apply only the 6, and the French score is 13.
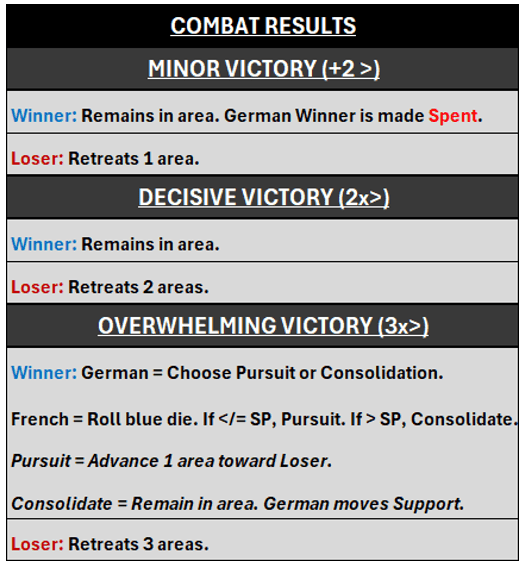
The Germans win a Minor Victory because they beat the enemy’s score but did not at least double it. First, both sides will talk casualties, which is determined by each side’s total combat score.

A German total of 19 inflicts a 3 SP loss on the French and a French score of 13 inflicts 2 SP loss on the Germans.
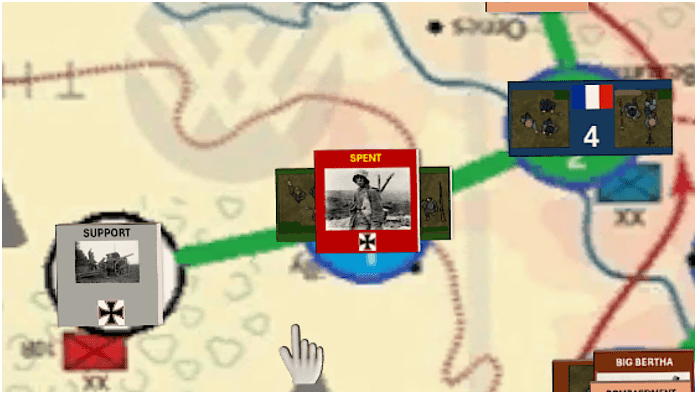
Both sides’ unit counters are replaced with new counters reflecting each unit’s updated SP value. The German counter is replaced with a “10” strength unit. In the case of the French, Don can choose how to spread the 3 SP loss, and he opts to eliminate the 3 SP French unit entirely. With a Minor Victory, the loser must retreat one space. The winner stays in the attacked space, but an attacking German unit is immediately made Spent. This means the unit is done for the entire turn – Don cannot activate this unit for the remainder of the game turn. He places a “Spent” marker on the unit and its activation is done.
Not a great start for the German Army. Don now has to decide which of the remaining three units he wishes to activate next. Stay tuned and we’ll see with the next article what Don chooses to do.
