

Checkpoint Charlie Sample Turn
Perhaps the best way to explain the mechanics and the unique movement system of Checkpoint Charlie is to walk through a sample turn. If watching a video on this topic is more to your taste, click here or see below.
All game components shown here are prototypes intended only for playtesting. This is not final artwork.
COMPONENTS
If you’ve read the P500 page for Checkpoint Charlie, or any of the other InsideGMT articles about this game, you may already be familiar with its components, but assuming that’s not the case, here are some basics you’ll need to understand for this sample turn.
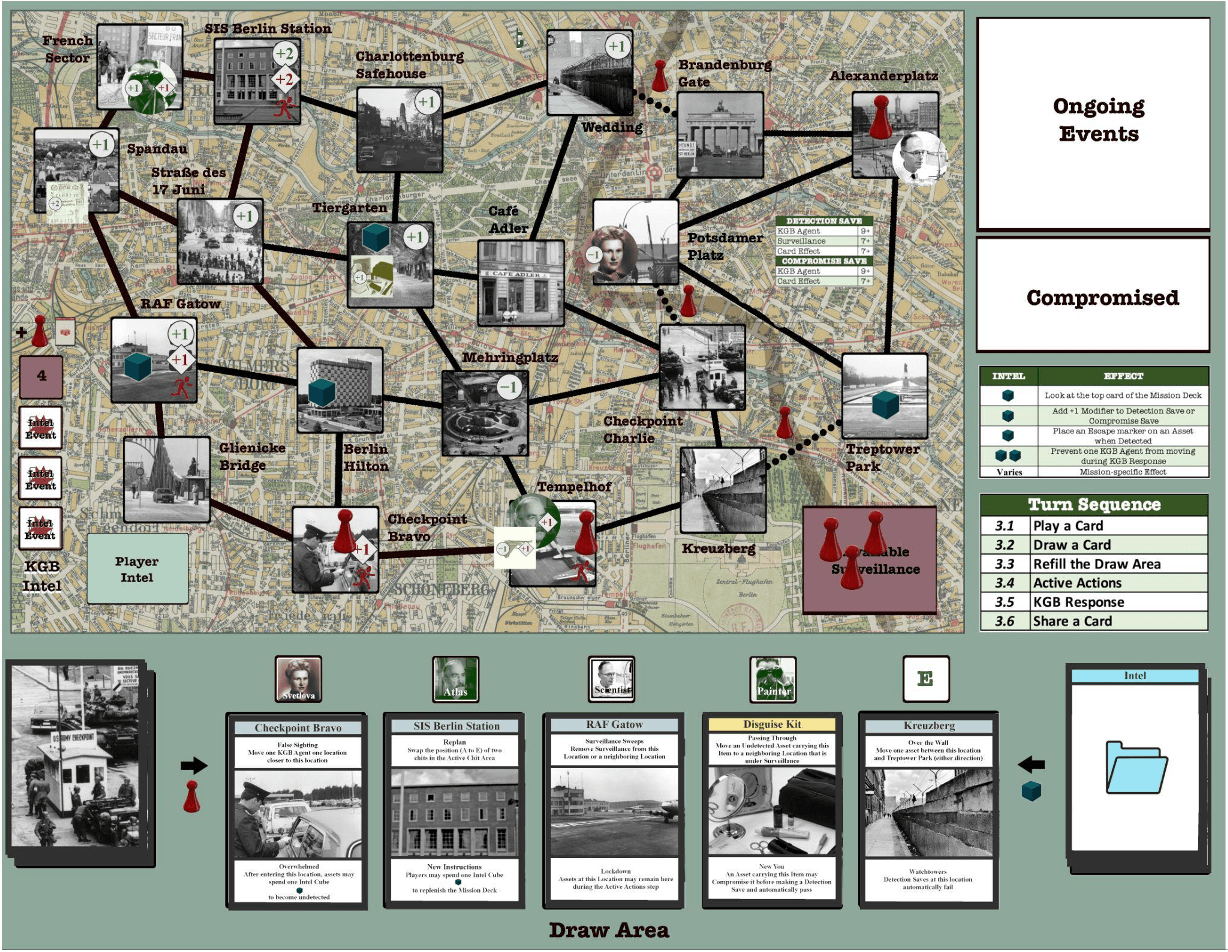
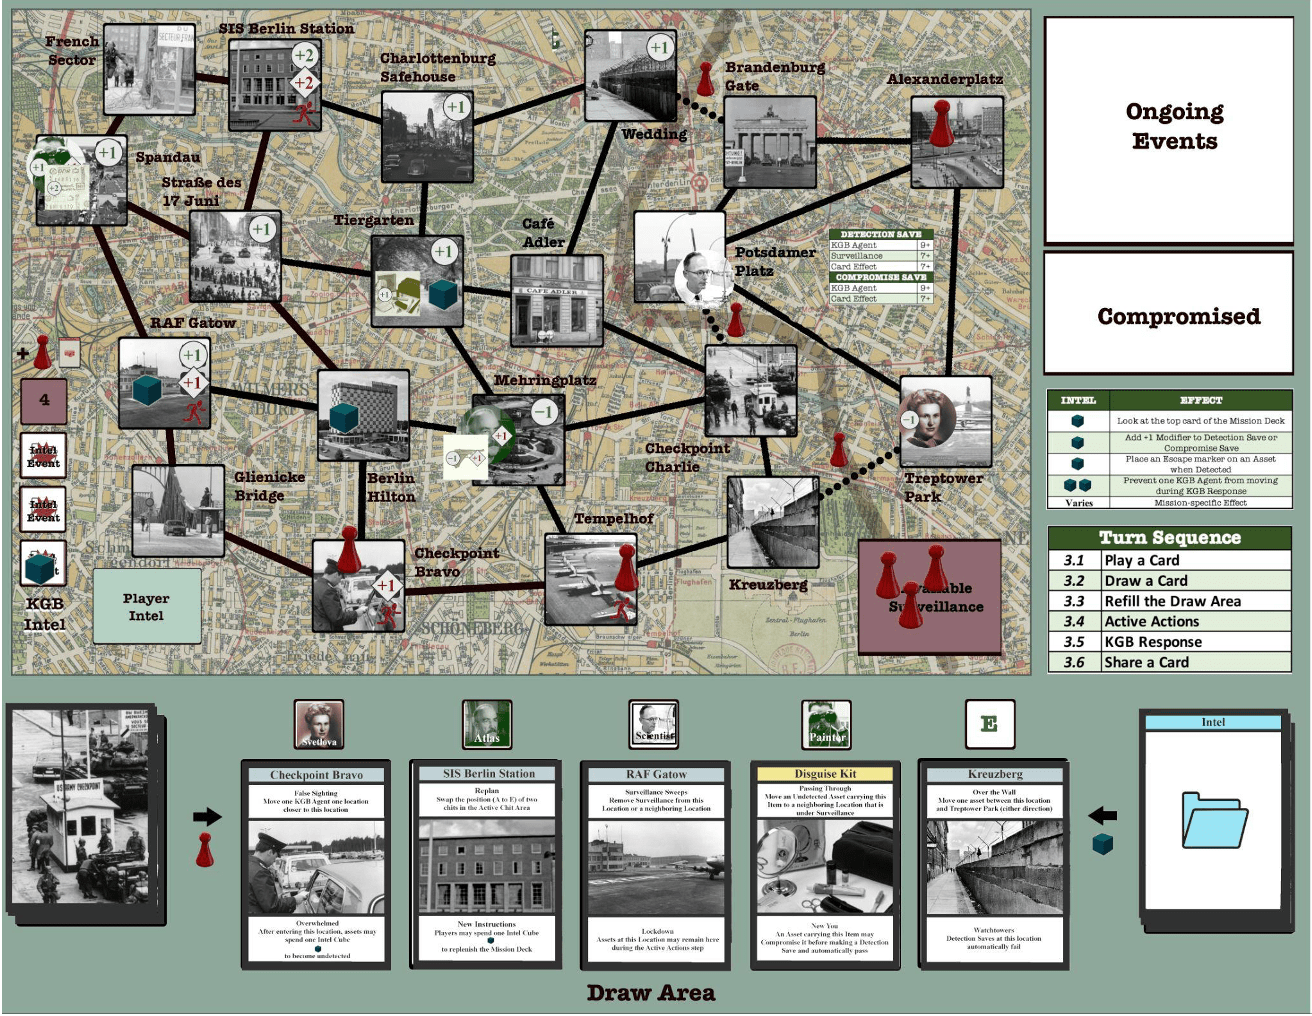
At the top of the game board is the city map, consisting of twenty locations in Berlin connected by travel lines. The assets, special items, and KGB agents move between these locations during the mission. The three dotted travel lines allow crossing of the Berlin Wall between East and West Berlin, which the player’s assets (agents) cannot do without some special card or game effect.
At the bottom of the board is the draw area, made up of five designated locations for face up cards, plus a small square above each of these cards where a chit corresponding to one of the tokens (the assets and agents) on the map will be placed. The Draw area is the core mechanic of the game, controlling movement of tokens and placement of Intel and Surveillance. Each of the cards in the draw area also has text on the bottom describing an effect that applies as long as that card is showing in the draw area. The mission deck sits to the left of the draw area and the discard pile is to the right.
On the city map below, you’ll see round tokens representing my assets (green tinted), the KGB agents (red tinted), and for this particular mission, a neutral scientist token in the upper right corner of the map. You’ll also see square item markers, like the Luger 9mm pistol being carried by Atlas (bottom center, at Tempelhof) and the Papers marker at Spandau, in the upper left.
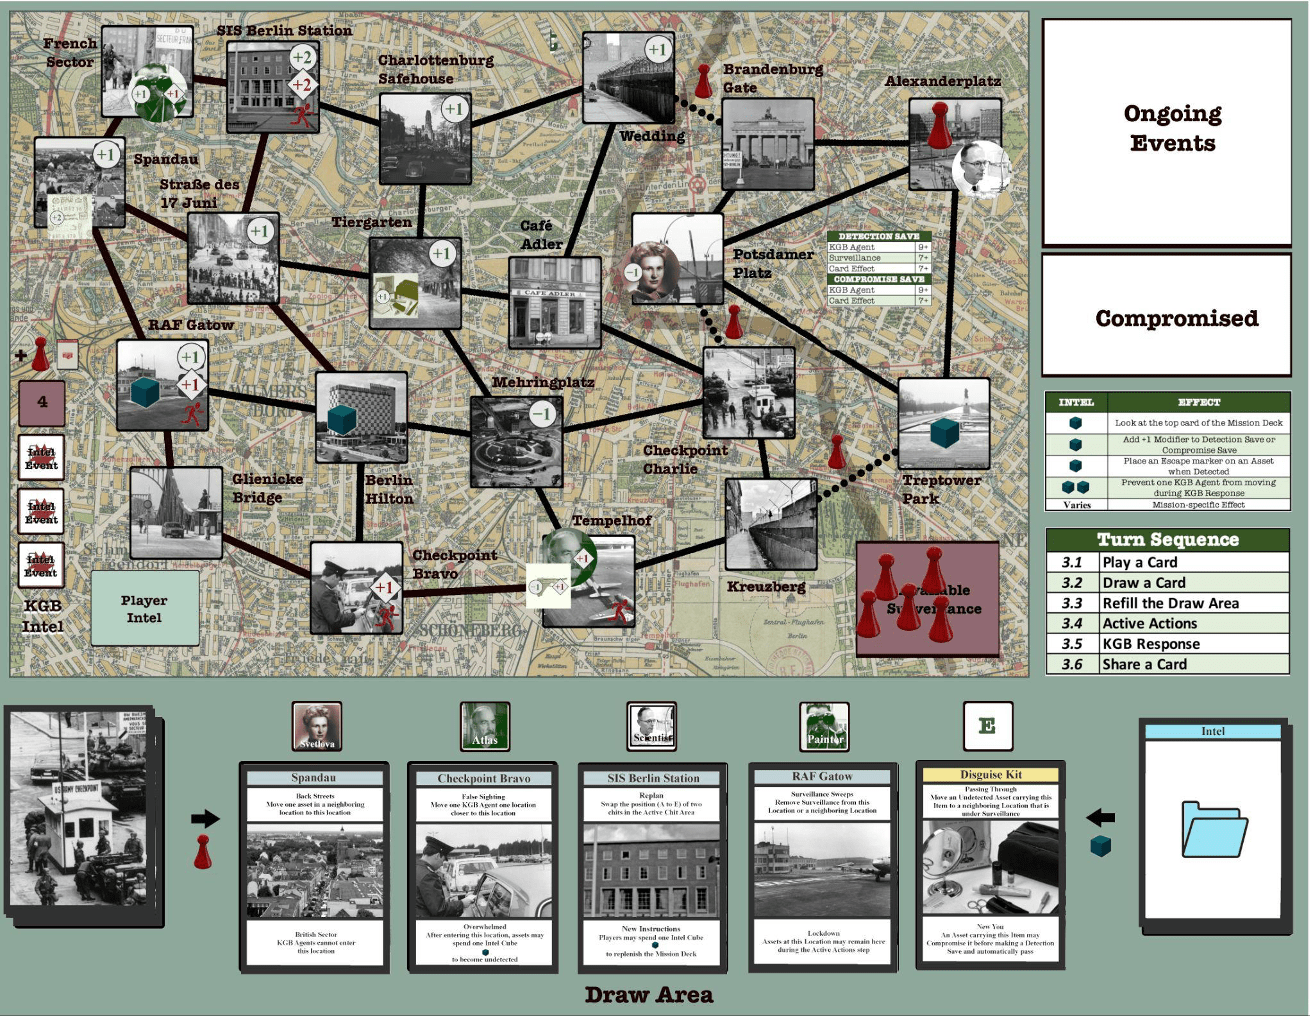
You’ll also see blue cubes on the map. These represent intel pertinent to the mission that can be gathered by both my assets and the KGB agents when they enter a location. If my assets collect intel, it goes into the Player Intel area and I can spend it for helpful game effects. If the KGB agents collect intel, those cubes fill up the KGB Intel track to the left of the map and can trigger detrimental effects.
The map currently contains one red pawn, showing that a location (in this case Alexanderplatz) is under surveillance. There are also images of three red surveillance pawns as part of the board itself, on the dotted travel lines, showing that the paths across the Berlin Wall are always under surveillance. More surveillance will appear as the mission progresses. When an asset enters a location under surveillance or crosses the Berlin Wall, they must roll a die to avoid detection. If detected, they will be pursued by the KGB agents and be removed from the mission if caught and compromised.
MY GOALS
This sample turn is near the start of Mission 10, The Extraction. The overall goal of this mission is to get an asset across the Berlin Wall to make contact with the Scientist and guide him to safety in the west. At the moment, neither the cards in my hand (see below) nor the cards in the draw area provide a way to cross the Berlin Wall, but that’s okay. I want to do some preparation first. I have the Papers card in my hand, which can be very useful if an asset is carrying the Papers item, so my goal for this turn is to move The Painter (in the upper left) into Spandau to pick up the papers, without causing problems for Atlas. I plan to do this by drawing the Spandau card from the left of the draw area so that the Disguise Kit card slides over beneath the Painter’s active chit. But I’m getting ahead of myself.
THE TURN SEQUENCE
The player repeats the following turn sequence, as shown on the right side of the game board, until the success or failure conditions of the mission are met. There are no turn limits in Checkpoint Charlie. In multi-player games, each player performs the entire turn sequence before play passes to the next player.
PLAY A CARD
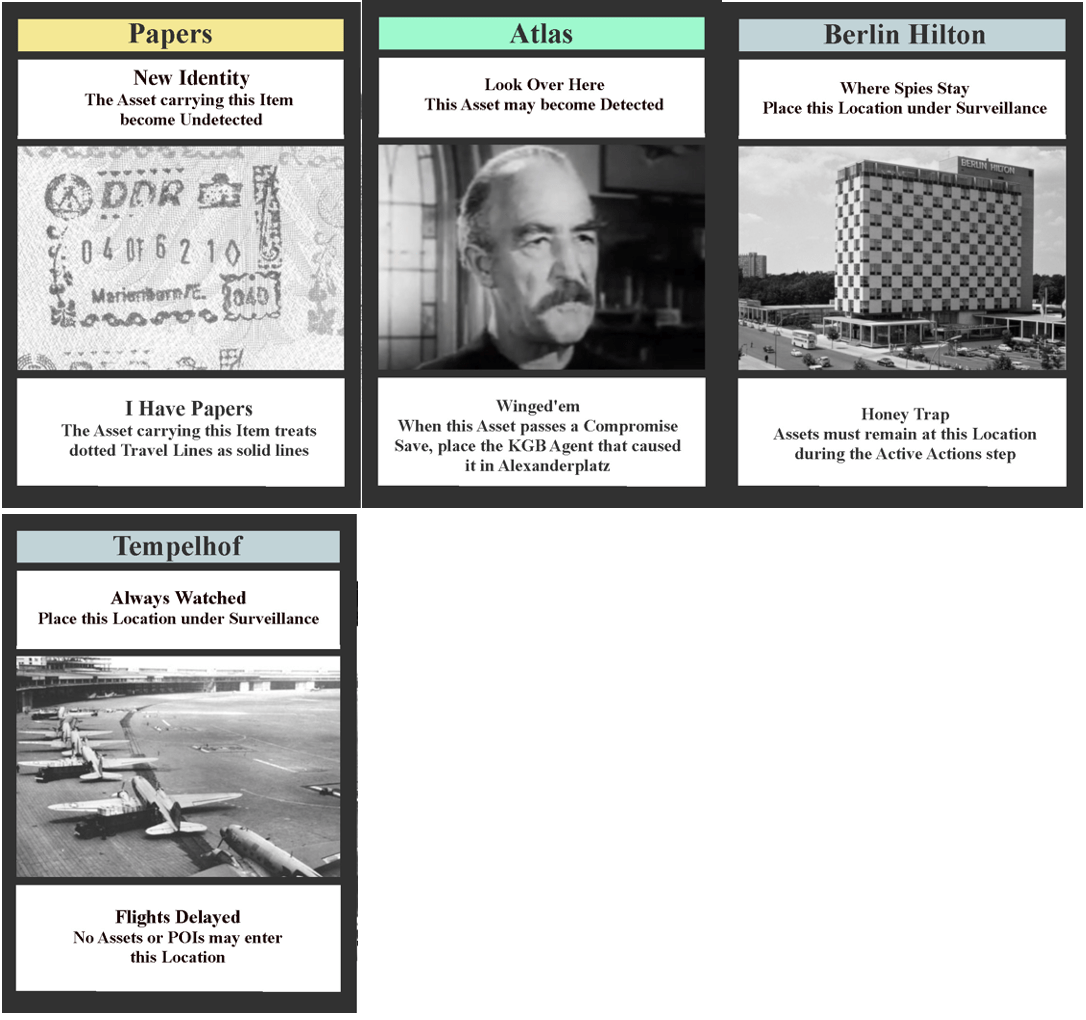
The first step in the turn sequence is to play a card from my hand. This will have the effect shown at the top of the card and that effect is not optional unless the word “may” is included. I want to hold on to the Papers card because my plan is for the Painter to pick up the Papers item. I also want to save the Atlas card for now. Although detection is generally a bad thing, this card allows Atlas to become detected voluntarily at a time of my choosing, perhaps creating a useful distraction and drawing KGB agents away from someone else.
That leaves the Tempelhof and Berlin Hilton cards. They both place their respective locations under surveillance, and that, too, is usually a bad thing. However, these cards can help “use up” surveillance. There are a limited number of surveillance pawns available to the KGB, so if a location must be placed under surveillance and there are no pawns available, the player gets to first remove surveillance from a different location.
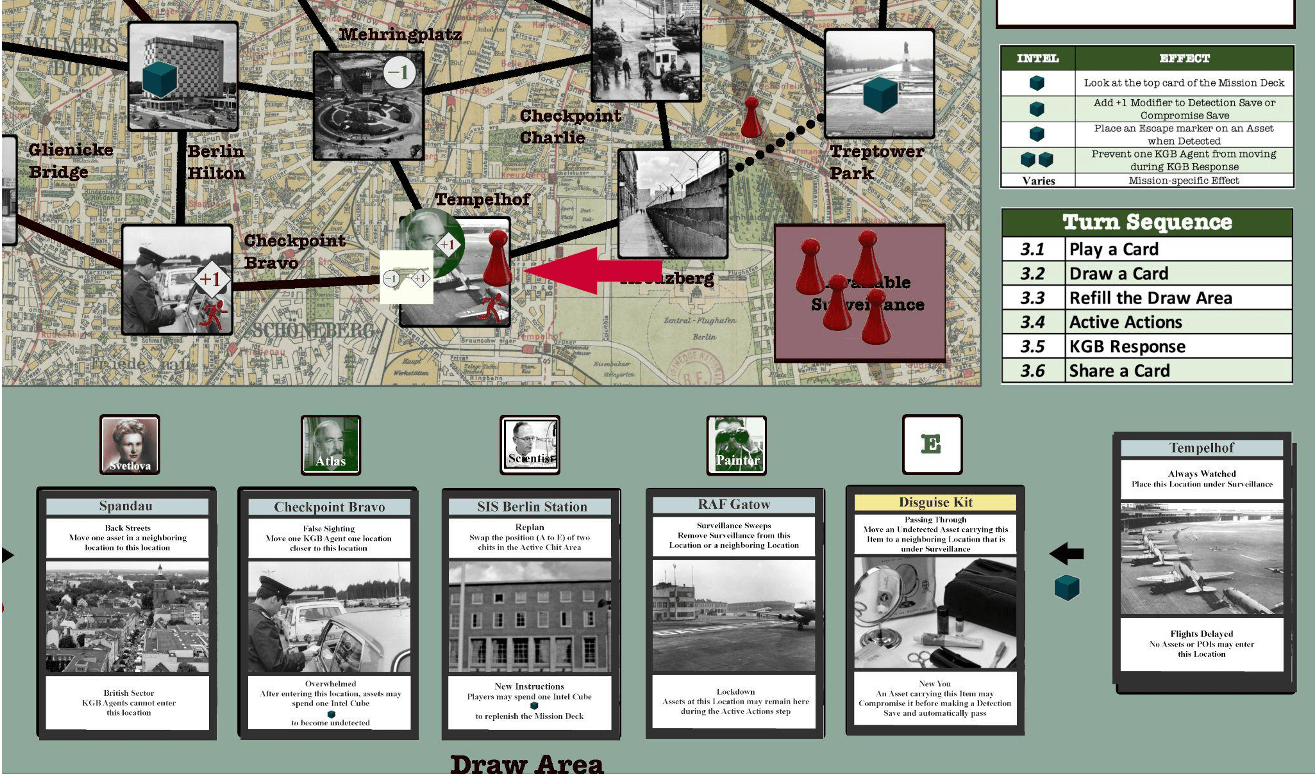
I must play a card, so I choose Tempelhof. Atlas is currently at that location, but he won’t be at risk of detection because, as we’ll see in a minute, he’ll be leaving this turn. Assets only make detection saves if they move into or remain at a location under surveillance. I play the Tempelhof card by placing it on top of the discard pile, then I move a surveillance pawn from the Available Surveillance area to Tempelhof.
DRAW A CARD
During this step, the player draws a card from the draw area, but they are limited to the two cards on either end of the row – in this case Spandau or Disguise Kit. Because I want the Disguise Kit card to end up under Painter’s chit (we’ll see how this happens in the next step), I draw the Spandau card and add it to my hand. This leaves an empty card position on the left side of the draw area.
REFILL THE DRAW AREA
This step is not as simple as just taking the top card from the mission deck and placing it in the empty position. Before taking a card from the deck, the four cards remaining in the draw area all shift over one space. In this case, since I drew the card on the left, they all shift left. If I had taken the card on the right, they would shift right.
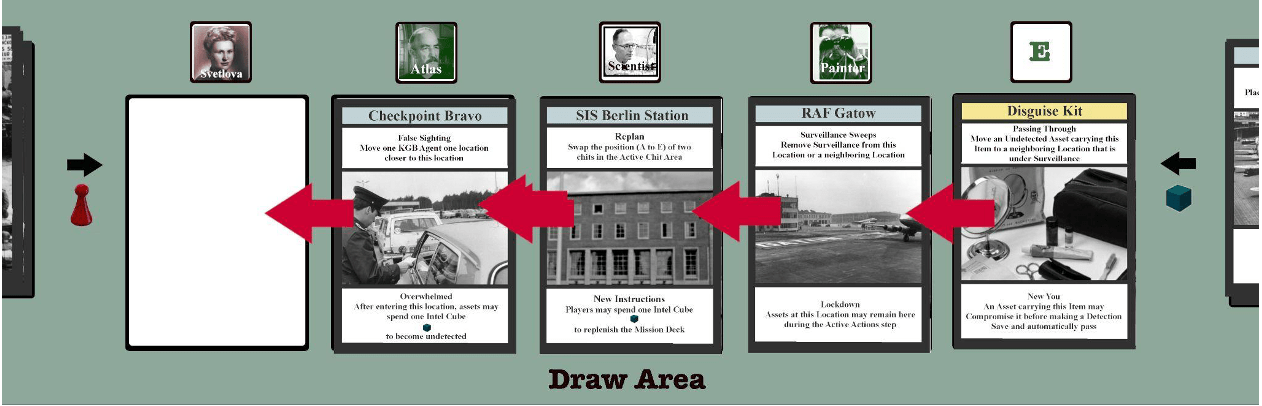
Now I draw the top card from the mission deck to refill the empty position on the right. Unfortunately, I draw a Surveillance card. There are three types of cards in the mission deck that cannot go into the draw area – Surveillance cards, Intel cards, and Event cards. When one of these cards is drawn, it is dealt with immediately and discarded, then another card is drawn to fill the empty position. The Surveillance card I drew places a location under surveillance. In particular, it places the location represented by the leftmost card in the draw area under surveillance, which happens to be Checkpoint Bravo. I move a surveillance pawn from the Available Surveillance area to Checkpoint Bravo.
I draw another card from the mission deck, and this time I get an Intel card. This works similarly to the Surveillance card. It places an Intel cube at the location represented by the rightmost card in the draw area. In this case, the rightmost card is the Disguise Kit, so the Intel cube goes at the current location of that item, which is Tiergarten.

I discard the Intel card and draw another card, getting Kreuzberg, which can fill the empty position. Only Location, Item and Asset cards can reside in the draw area. At the end of the Refill the Draw Area step, the board looks like this.
ACTIVE ACTIONS
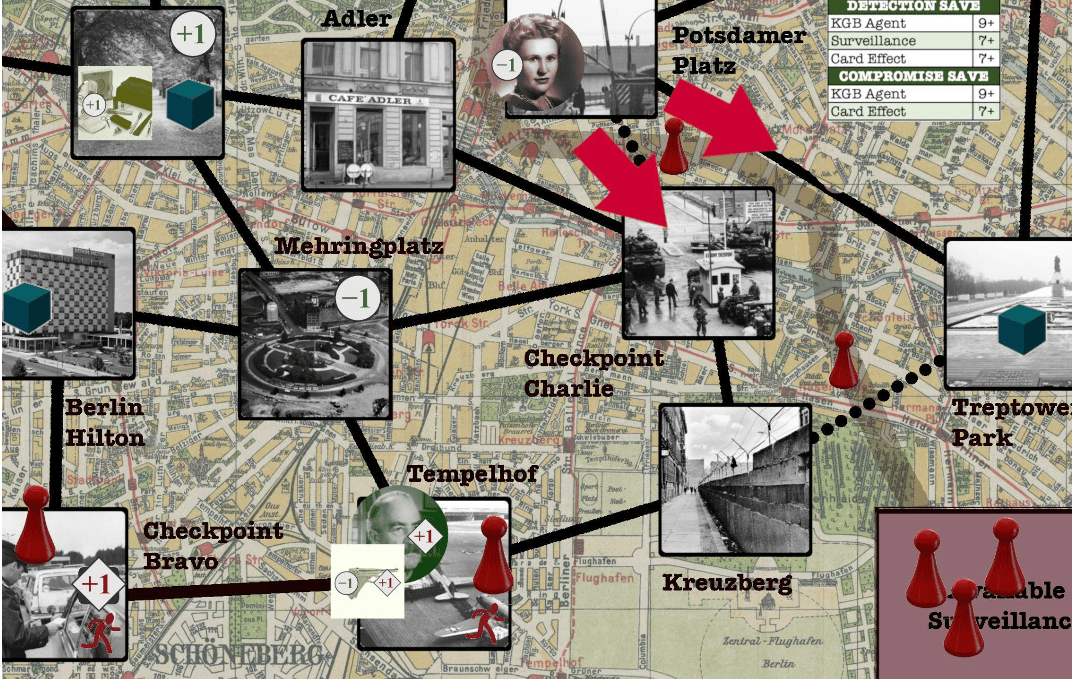
During the Active Actions step of the turn sequence, the tokens on the map all move. Where they move is based on the location of their corresponding chit in the boxes above the draw area cards. Checking the draw area and moving from left to right, each token moves one location closer to the location represented by the card below its corresponding chit. In this example, KGB agent Svetlova is the leftmost chit, and the card below that chit is Checkpoint Bravo, so the Svetlova token moves one location closer to Checkpoint Bravo. She is currently four locations from Checkpoint Bravo, and moving to either Checkpoint Charlie or Treptower Park would leave her three locations away, so these are both valid destinations. Normally the player can choose in cases like this, but Treptower Park has an Intel cube, and given a choice, KGB agents always choose locations with Intel cubes over those without, so she moves to Treptower Park and gathers the Intel cube.
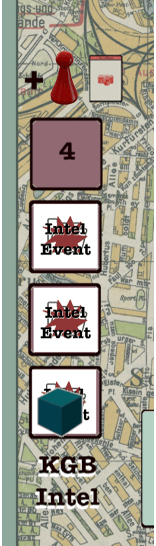
The Intel cube is placed on the first (lowest) unfilled box on the KGB Intel track, which I can tell triggers an event because of the Intel Event marker there. I consult the mission description and find that I must add a Surveillance card to the mission deck, I add that card and reshuffle the mission deck.
Continuing to the right in the draw area, I see that Atlas’s chit is next and he is moving toward SIS Berlin Station. Both Checkpoint Bravo and Mehringplatz are closer, and I choose Mehringplatz because Checkpoint Bravo is now under surveillance. Note that Atlas is leaving Tempelhof, which means he doesn’t have to roll to see if he’s detected by surveillance there.
The next chit is the Scientist, who moves toward RAF Gatow. Potsdamer Platz is the only location that is closer, so he moves there.
Finally, I get to The Painter, who must move toward the Disguise Kit, which is at Tiergarten. Both Spandau and SIS Berlin Station are closer, so I choose Spandau because that’s where the Papers item marker is. When an asset enters a location, they may pick up any items there, so he grabs the Papers, which was my main goal for this turn. There is no chit above the final card in the draw area, so the Active Actions step is complete.
KGB RESPONSE
During this step, all of the KGB agents on the map move toward the closest detected asset or item. At this point there are no detected assets or items, so nothing happens.
SHARE A CARD
This step only applies in multiplayer missions when someone plays a card from the shared hand and must replace it. It doesn’t apply when playing solitaire. The board looks like this at the end of this turn.
FUTURE TURNS
I did what I set out to do this turn – getting The Painter the Papers item without getting Atlas into trouble. There is significantly more surveillance on the map and I still don’t have a way across the wall, but the Kreuzberg card that just appeared can provide that. I want to grab that card and start moving The Painter in that direction. With the Papers item and his innate bonus to avoid detection (the +1 in the green circle on his token) he is better suited to crossing the Berlin Wall and making contact than Atlas. I’ll hold onto the Atlas card and use him as a distraction if needed.
CONCLUSION
There are lots of situations we haven’t focused on in this sample turn, like being detected, spending intel cubes, or drawing event cards, but I hope this gives you a better idea of what playing Checkpoint Charlie feels like and the types of decisions you might make during your turn. Join me next time when I talk about playing through multiple missions in Checkpoint Charlie’s Campaign Mode.