

Spotsylvania May 18th : A Knife Fight in a Phone Booth
Introduction
Here is another strategy analysis for owners of Army of the Potomac. The Spotsylvania May 18th scenario (Playbook, page 16) begins right where the Rebel Fury Spotsylvania scenario ends. In many ways the battle of Spotsylvania courthouse began on the night of May 7th and concluded on May 18th becoming one of the longest, bloodiest, and most significant battles of the Eastern theater. In William D. Matter’s, If It Takes All Summer: The Battle of Spotsylvania he breaks the battle into four phases and this scenario is the connective tissue between volumes one and two of the Civil War Heritage series:
- Disengagement and Reengagement, 6-8 May (Rebel Fury)
- Thrust and Parry, 9-10 May (Rebel Fury)
- Thunder in the Morning, 12 May (Rebel Fury)
- North-South Becomes East-West, 13-21 May (Army of the Potomac)
At this point in the campaign Grant is not thinking about capturing Richmond but destroying the Army of Northern Virginia. He had the secondary objective of pinning General Lee in place to prevent him from detaching units to the West (Longstreet’s Corps) as occurred the previous fall likely tipping the scales in Rosecrans’ defeat at Chickamauga.
This scenario is both an expert level one map scenario and simultaneously the opening set up for the 1864 scenario that uses the new series campaign rules. That said, if you know how to play Rebel Fury, you can play this scenario right out of the box. The reason I say it’s an expert level scenario is that it takes skill to achieve the historic Confederate victory. A quick examination of the set up illustration in the Playbook (page 17) could have you assume that the Army of Northern Virginia is in a simple static defense ala Fredericksburg. That would be totally incorrect as the terrain is very different from that infamous battle and it requires a nuanced set of tactics to follow history’s path.
Based on extensive playtesting I came to realize that I could not write reasonable solitaire rules for the Confederates where even a small mistake or misstep would lead to a decisive Union victory, something that Grant was confident he could achieve. As it turns out he was wrong because General Lee and his army fought a dynamic defense that not only saw his entrenchments frustrate the May 18th assaults but saw a Confederate IInd Corps counterattack against a vulnerable Union right flank. Even when he was cornered, Lee’s basic instinct was to attack which he did repeatedly over the ensuing month of May.
I have found this scenario to be very replayable as it captures the nuances of this historical situation where success or failure was measured in moments whose outcome was more in doubt than is commonly understood. My intent with this article is to share some hard learned playtest lessons during your first experience with this scenario. As always, spoiler alert, if you want to discover these things for yourself now is the time to stop reading.

Note: All hex references are exclusively on Map A, so I will forgo writing A3704 which will be shown as hex 3704. Most images come from the excellent Vassal module created by Joel Toppen with the remainder from a production copy of Army of the Potomac.
CSA Strategy
At first glance this scenario appears as a static defense with the expectation that the Union will experience a second Fredericksburg. Based on playtesting this Southern strategy usually results in a decisive victory for the future 18th President of the United States. Grant’s best opportunity to win this scenario will occur by gaining a decisive advantage during the early turns of what William D. Matter describes as phase four of this epic battle.
Historically Lee has just lost the Muleshoe (see Rebel Fury Spotsylvania scenario) and Johnson’s division. Lee is unclear on what Grant has in store for him (hence his battle mode). Grant on the other hand has the initiative and he attempts the first of the campaigns night marches where he attempts to shift his forces from one flank to the other to launch a morning attack. In retrospect all of them failed, but just barely. If Lee fails to execute similarly aggressive counter maneuvers, the larger Union army has the advantage. What follows is how to think about his situation and hopefully do as well as the Confederates did in May of 1864.
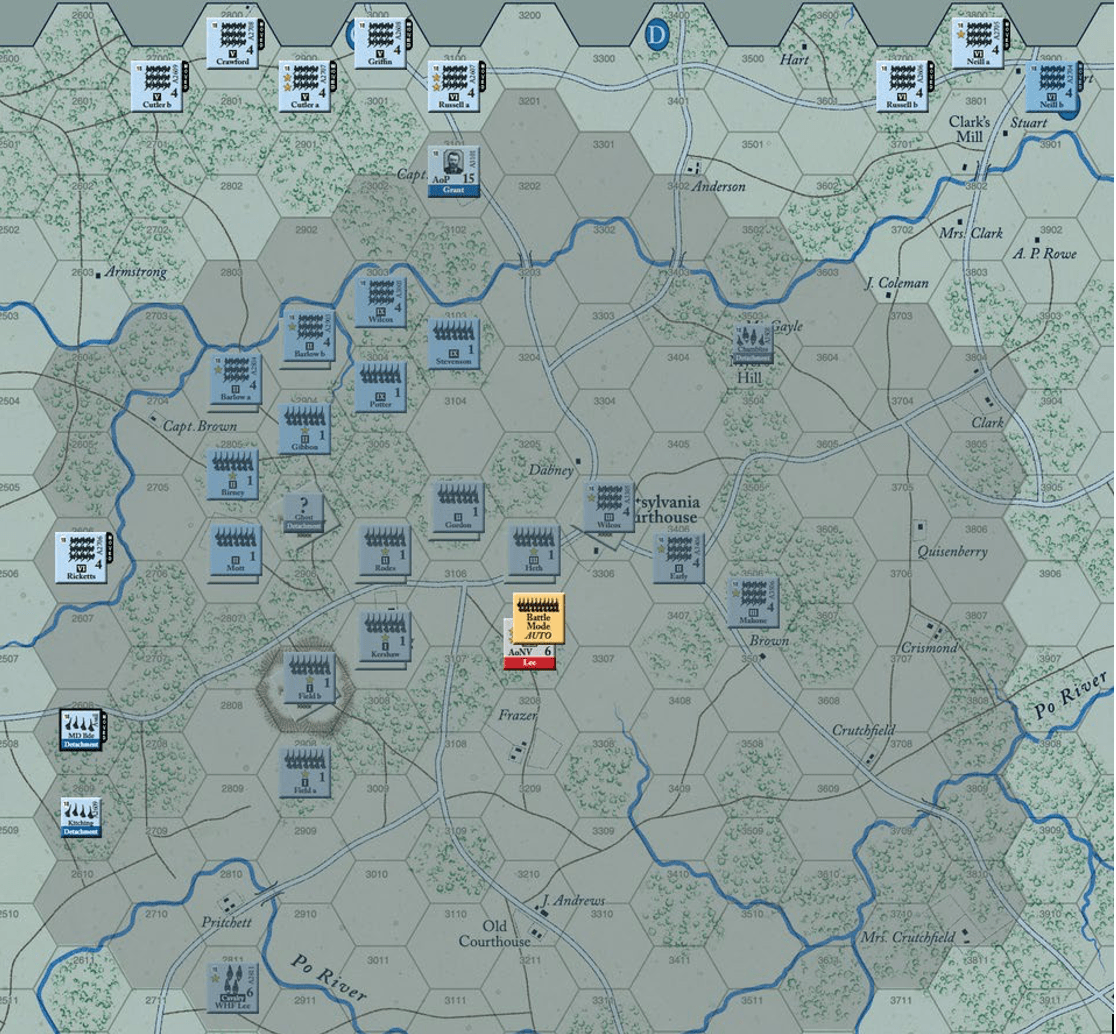
CSA Tactics
I will explore what happens if the Union does not make a Night March or only redeploys one Corps, not two, later in this article. This portion of the analysis assumes the historical night march by the Union Vth and VIth Corps. It is important to note that the May 14th AM turn begins with the Movement phase. This means both HQs remain in the same mode for the first full turn. It also means that there is no Detachment segment or Organization Phase. Also note that it is raining for the remainder of the scenario, so there are no extended marches allowed beyond the May 13th end phase.
Per scenario rule the Union has the initiative for the May 14th AM turn, so what are their first move choices. Since Grant’s intent was to shift two Corps onto the weaker Confederate right flank, we will use the two advanced divisions (see illustration 2) to continue the turning movement. The other choices are:
- Directly attack the Spotsylvania entrenchments (something a Marine friend of mine successfully accomplished on turn 1).
- Shift the attack to the CSA left and center via the Muleshoe.
- Assault Myer’s Hill (where the Confederate detachment is located).
- Or as we will follow for this article a continued attempt to turn the Confederate right flank.
Turning the Confederate right flank presents two choices.
- Choice one (historical): hit the Confederate forces north of the PO River in the vicinity of Myer’s Hill.
- Choice two: continue a wider flanking maneuver enabled by the asymmetrical HQ command ranges locked into the first turn.
From playtest observation the majority of Union commanders chose the wider flanking maneuver. I will use this as the basis for most of this articles narrative but understand there are other possible choices. With the forces arrayed as in illustration 2 a good Union first move has VIth Corps division (Neill b) moving via road to the Clark house (3804). I’ll use this move as a point of departure to discuss General Lee’s basic options and tactics for the first turn of the scenario.
For starters, Lee’s highest priority is to prevent the Union from turning his right flank. The following set of Confederate tactical responses to Grant’s historic plan are not listed in priority order as a Rebel player’s response has to be tuned to the precise moves made by the Union player. My intent is to make you aware of some details that are not always obvious the first time you play this nuanced tactical scenario.
My bottom line is the CSA cannot just sit in their starting positions and see how things develop. Assuming an aggressive Union player, the CSA will be forced to secure their right flank from being turned. Herein are a set of units, positions, and tactics that the CSA should consider as the situation unfolds.
The basic tactical challenge is how to shift forces from unthreatened sectors to threatened ones. This will require Lee to thin out some portions of his defenses to create maneuver forces to challenge Union efforts to turn his flanks. The three Confederate units that are likely to see early use are the right flank divisions of Wilcox, Early, and Mahone. Their mission will be to prevent
the Army of Northern Virginia’s right flank from being turned. The critical hexes and desired outcomes are:
- Myer’s Hill (3503) needs to have a Division relieve (enter the hex) with the Chambliss detachment. The goal here is not to let the Union overrun the detachment and put a ZOI over the Rebel front.
- Assuming Myer’s Hill does not fall during the May 14th AM turn, the CSA should recall this detachment in the PM turn.
- Get a ZOI over hex 3704 from defensible terrain. Best candidate position is getting a division into hex 3606, but do not be in a rush depending on how the Union makes their second and subsequent moves.
- Put the bridge at hex 4007 under a ZOI if it appears the Union is trying to cross the PO river. While the ZOI doesn’t prevent the Union from crossing the river it will slow their rate of advance short circuiting any real progress from an early CSA pass (assumes 19 Union moves after a CSA pass).
- Spotsylvania Courthouse (3305) is where I like to lay a nasty ambush. I will almost always vacate the entrenchment to shift Wilcox to the right flank. Depending on where the Union moves first, it is a single move for Wilcox or Early to move onto Myer’s Hill and at worst its two. Now you are asking yourself, who in his right mind would evacuate the critical position. Me for one and it’s something I have pulled off several times.
- Upon seeing the golden ring exposed, the Union is incentivized to capture the Courthouse and win the scenario. Due to the location of Heth they will flip to battle formation prior to reaching the objective.
- Once the Union is adjacent to Spotsylvania CH move Heth into the entrenchments forcing a mandatory attack during the ensuing combat phase. High risk to be sure, but when you are playing a wargame you should consider a 90% chance of success as an opportunity. Smiling wickedly as the Union takes the bait can get you an extra move when they experience fear and hesitation. Well, it sometimes works when playing chess.
- Shift one Ist Corps unit (Kershaw or Field a) toward the center into a reserve location. Due to these units beginning in battle formation this will take about a half dozen moves before they are anywhere useful. This Division often secure a vulnerable sector from being turned or penetrated.
- Another critical unit is the WHF Lee Cavalry division whose 6 hex rate of advance along roads (remember it’s raining) can and should move to the vicinity of the Crutchfield house (3810) to throw a ZOI over the Wm. Dickinson house (hex 4011). If the Union gets overly aggressive this unit may have to directly engage Union infantry at a disadvantage. One side benefit is that Union players are often seduced to expend a precious artillery ammunition point to knock this unit out. The silver lining is the Cavalry division is likely to return, but the ammunition will not.
- The last important objective is to fortify the center so it can be held with less defenders. The CSA should begin construction of entrenchments with any combination of Kershaw, Rodes, and Gordon. The construction of entrenchments often causes the Union to assault the Muleshoe to put these construction sites into a ZOC to prevent their completion. Another subtle tactic is to have Rodes advance to cover Gordon’s entrenching, a tactic that pays dividends here, followed by a subsequent next turn disengagement. Creating pressure on the Union player to assault the ‘ghost’ detachment in the Muleshoe entrenchment can often lead to a fortuitous blown Union Division with potentially more ammunition expenditure. The ‘ghost’ detachment skirmishers are annoying and at times useful.
As you can see, the CSA is making about a dozen moves (this includes constructing Entrenchments), then passing. The sooner the CSA can pass the better, but do not do so if the Union has open roads around the Rebel flank sans ZOCs to impede them. The benefit for Lee in this situation is that an overly aggressive Union player might prevent the Grant HQ from changing into Battle mode to avoid putting these far flung forward divisions out of command. When Grant is not in battle mode, the Army of the Potomac will need artillery support to counter Lee’s battle stars.
Now remember, no plan survives contact with the enemy and the dice love no one, but that’s a two way street and good play is putting your forces into a better position than your opponent. My nasty Spotsylvania courthouse ambush has a 90% chance of success, but there is a 10% chance of a disaster. Sometimes you have to float some risk if you want to follow in Lee’s footsteps.
What often happens is that the Union has several failed assaults with the big unknown whether the attackers pass their morale (soldier symbol on orange die) or were routed (blown result on orange die). Given the number of attacks the Union is likely to have available, their big decision point is reached if and when they have two blown units. This puts the question to the Union player; will they risk a third? If this occurs and the CSA has not yet passed this is an opportunity for a counterattack to knock out a third Union unit. If the Union makes approximately six attacks during this turn, statistically this critical moment will likely occur and what happens next is very player and situation dependent. Just don’t be surprised when this moment is reached during the May 14th AM turn.
Given the vicissitudes of combinatorial mathematics, relative player skill, and whether there is a cat in the house determines how things proceed. Every set of choices described above has occurred during playtesting, so all options are quite possible. While I chose the wide
Union flanking maneuver as the main narrative for this article, my personal preference is the more historical Myer’s Hill assault. The obvious question is why?
The long pole in the Union tent is artillery ammunition. Much of Grant’s on hand artillery ammunition was expended in the Wilderness where the common wisdom about artillery usage is broadly incorrect in the three previous phases of this epic battle. With a total of 10 artillery supported attacks, the Union has to be quite circumspect about which hexes must be taken and which can use HQ support as a surrogate. While remembering that each time you use Grant (or Lee) there is a 6% chance that they will become unavailable for the remainder of the battle. The conundrum is the only way for the Union to remain offensively viable is through some a combination of artillery supplemented with Grant’s battle stars.
This is a very long winded way of saying that if the Union is executing a wide flanking maneuver, Grant cannot realistically go into Battle mode without neutering this option. So, do not limit Grant’s HQ options unless you intend to aggressively push a wide turning movement or suffer the consequences of ending the advance due to command range.

Union had three blown divisions and will consequently lose Cutler a (one of their best units), whereas the CSA had their Cavalry Division blown holding the far right flank at the cost of a Union ammunition point. Lee’s battle rating was used successfully once… phew! Note that each time you use your HQs battle rating there is a 20% chance of a general casualty and a two battle star HQ (Grant and Lee) has an overall 6% chance of you having a bad day.
No Union Night March
In a significant minority of cases, I have seen the Union decide to forgo the night march redeployment (see campaign rules to see both types of night march options) and have the Union Vth and VIth Corps attempt to turn the CSA left flank. Here the key defensive position is the Laurel Hill entrenchment that historically resisted all Union attacks. This flank is bereft of useful river crossings to facilitate a Union turning maneuver hence making it a tougher path to follow. The obvious CSA response is to shift some right flank units, such as Early’s division, to the threatened sector as necessary. As this is a tougher lift for the Union, the Confederate player should have an easier time of it, although one of the most decisive Union victories I ever saw occurred following this plan.
Organization Phase Grand Tactics
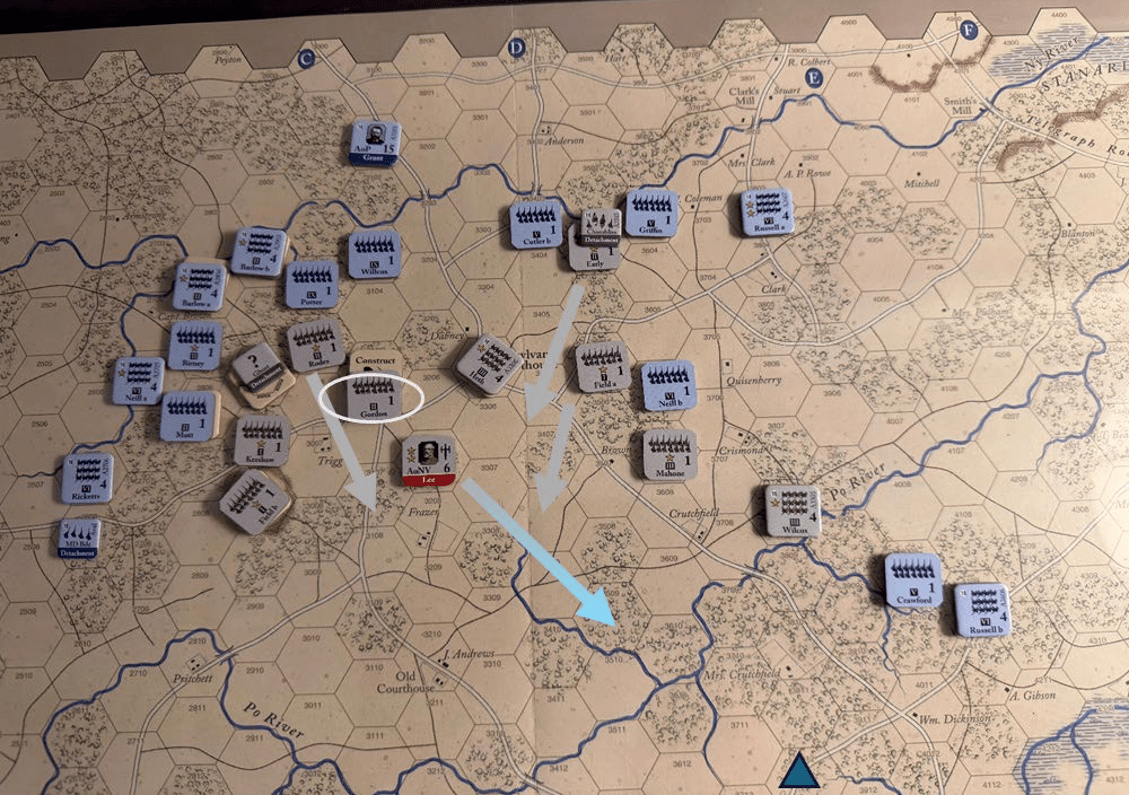
Key:
Command Phase: CSA has the initiative due to Lee HQ battle stars (rule 4.1). Blue arrow shows the new location for Lee’s HQ redeployment in Battle mode with the triangle showing the approximate location for a CSA Detachment. CSA detachment is recalled.
Organization Phase: Gray arrows show three CSA divisions disengaging (arrows do not show actual three hex paths) with the oval indicating Gordon’s Division completing an Entrenchment.
During the May 14th PM Command and Organization Phases (see illustration 4) the Confederate army repositions its forces in preparation for the next round of Union attacks. The Confederates will automatically have the initiative due to Lee’s two battle stars (see Rules 4.1).
The most important player decision is where to deploy their HQ marker? It’s important that Lee’s command range aligns with the limits of Grant’s command range on the right flank so the Confederates can react to any further advances while remaining in Battle mode.
The advantage and at times necessity for putting your HQ in Battle mode is it offers opportunities to more effectively attack or defend while conserving artillery ammunition. In this scenario Grant’s HQ must be located within 6 hexes (battle mode range) of Spotsylvania else forfeit 15 VPs to the Confederates. In this case Grant’s original location at the Alsop house (3101) in Maneuver mode still appears to be a good location.
The Union choice on whether to remain in Maneuver or change to Battle mode will be driven by the position of their advanced forces. In this session, the aggressive position of the two Union divisions necessitates the longer maneuver command range. If the Union had made a shallower advance a Battle mode decision would have been an option.
During the Organization Phase the completion of an additional entrenchment by Gordon will create a strengthened center that free up Rodes for maneuver to any threatened sector.

At this point I will discuss the situation with less precision as the number of positions and force permutations is beyond the reach for a short article.
Now what?
Going forward it is hard to predict what happens, but the longer the CSA holds onto Spotsylvania Courthouse the less points it is worth. This represents Grant’s evolving view that he may have to walk another path to ultimate victory. The balance point for this scenario is the Union capture of the Courthouse (late scenario 15 VPs) is equal to Grant losing 5 divisions. An early capture of the objective is an almost guaranteed Union victory whereas failure to take the Spotsylvania is essentially a guaranteed loss. As I said in my opening, this is a very tense scenario that often turns on a mistake and the relative rate of casualties. With skilled play the Confederates won a slight majority of playtests, but a significant minority of cases had alternate outcomes especially with less experienced players.

If you examine the May 16th position (Illustration 6) you will see a common Union position after having tried to hit both flanks and failed. As there is no strategic victory condition in this scenario the early capture of Spotsylvania Courthouse is a Union win. If this has occurred, reset the scenario or have a Scotch.
At this typical mid-point, the Union has to decide whether to continue to try turning a flank or concentrate on a big attack against Spotsylvania. The Army of the Potomac likely does not have sufficient ammunition to continue with a flank maneuver and the limitation on Grant’s location (6 hexes from Spotsylvania CH) often means you need a redeployment turn to bring your wings closer to the HQ so it can go into Battle mode for a big attack.
I will note that in the majority of playtests Lee made at least one casualty roll, so this level of successful defense can come at a cost. As this is the mid-point in the scenario the VPs for Spotsylvania have dropped to 15 from 20 and the Union has likely lost at least one eliminated unit. Both sides at this point are running low on artillery ammunition, so the Union has to conserve their remaining rounds for a big end game assault akin to Grant’s failed May 18th assault.
Going forward the CSA has to gauge each turn based on what is happening on the map. Any time the Union has suffered two blown divisions, you must consider a counterattack to knock out a third. An even more important consideration is the Union ability to make headway relies on artillery support. As each side receives only 10 ammunition points it takes iron discipline to conserve your fire for use in the later turns. I will note that I have rarely seen a Union player be that patient.
Once the Union runs low on artillery ammunition, the advantage shifts to the defender and will necessitate HQs in battle mode taking a more active participation with the obvious risks this entails. I have seen many games where the Union ran out of ammo by the third turn, forcing overuse of Grant who ultimately became a casualty. By the same measure, the Confederates have to be judicious in their artillery use as having their ammo last longer than the Union is a path to victory. This is especially important late in the game when a well-timed counterattack nets a blown Union division who is defending in the open without artillery support.
The key to getting a Confederate victory rests on how you survive the opening when the Union’s advantages in numbers plus generous artillery support can flip the historical script. After the perceived near run Union victory on the 12th (Rebel Fury) Grant reported to Washington that he was winning, and he was not a man to delude himself. How things turn out for you when playing the Confederates is by history and my intent far from a sure thing.
Conclusion
Historically Grant’s redeployment changed the axis of the frontlines from North-South to East-West that failed to deliver the desired dawn attack as will usually be the case in Army of the Potomac. Most of the fighting on this day in 1864 occurred on and around Myer’s Hill (3503), which the Union finally captured in the afternoon of the May 14th. What then followed is Grant skirmishing with the dug in Rebels, basically what a ZOC/ZOI represents, finally massed two
Corps for his failed May 18th assault into hexes 3105/ 3205 (Gordon’s division sector). After this setback Grant sent Hancock’s IInd Corps (Campaign rules, Turning Movement Night March) in what began the first of a series of turning movements that culminated in the capture of Richmond and Lee’s surrender at Appomattox Courthouse in 1865.
I will end this article where I begin by restating that this scenario looks like another Fredericksburg, but that would be a false view. If the Confederates defend statically ala Fredericksburg, even against an inexperienced Union player, the likely outcome is the Army of Northern Virginia’s right flank will be decisively turned. This is the objective of a 19th century Grand Tactical maneuver combination that Grant was taught at West Point. While he failed, it was a near run thing and how this scenario portrays this battle.
My goal with this article is to give you some insight into a fascinating grand tactical scenario that is not well covered in our hobby. If you use the campaign rules with the Rebel Fury, Wilderness scenario start, you will see this scenario in its entire context. However, I find that it is a very interesting scenario in its own right and will improve your knowledge and enjoyment with the 1864 campaign that can easily be completed in a weekend or convention.
Previous Article: Army of the Potomac: Fair Oaks/ Seven Pines’ the McClellan Gambit